js中我们可以使用try和catch来测试和捕捉错误。看下面的代码:
try{
	aler("a");
	}
catch(err){
  alert(err.name+":"+err.message);
	}
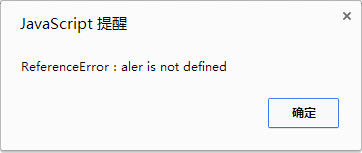
aler("a"); 这句是故意写错来测试的。在chrome中执行这个错误的语句,控制台将会输出错误:

使用了try和catch的话,我们可以在catch语句中自定义捕捉到错误后执行的代码。上面的例子中将会弹出消息:
keymaster.js是一个小巧易用的js键盘事件处理库,不依赖于其他库。使用时只需要引入其单个文件即可。使用代码如下:
// define short of 'a'
key('a', function(){ alert('you pressed a!') });

// returning false stops the event and prevents default browser events
key('ctrl+r', function(){ alert('stopped reload!'); return false });

// multiple shortcuts
key('command+r, ctrl+r', function(){ });

// shortcut with a scope
key('o, enter', 'issues', function(){ /* do something */ });
key('o, enter', 'files', function(){ /* do something else */ });
key.setScope('issues'); // default scope is 'all'

// query modifier keys
if(key.shift) alert('shift is pressed, OMGZ!');
我在同一个数据库中安装了两个 dedecms,第一个前缀是dede_,第二个是dede2_。现在不需要第二个 dedecms了,于是百度到一个从mysql数据库中批量删除相同前缀的数据表的办法。
先在phpmyadmin中执行下面的sql语句:
Select CONCAT( 'drop table ', table_name, ';' )
FROM information_schema.tables
Where table_name LIKE 'dede2_%';
执行之后,会得到一系列语句:
drop table dede2__addonimages;
drop table dede2__addonsoft;
………………
drop table dede2__vote_member;
这里面列出了删除所有dede2_前缀数据表的语句。全部复制下来,再粘贴到sql中执行就OK了。
我们常常用到for循环。有时候,合适的情况下使用for...in循环可以使得代码更加简洁。
    <script type="text/javascript">
     var a=['1','2','3','4','5'];
     for (var i = a.length - 1; i >= 0; i--) {
      	document.write(a[i]);
      };
     for(x in a){document.write(a[x]);}
    </script>
上面两个循环执行的效果是等价的。但是,for循环的循环方向(i是自增还是自减)是可控的。像上面的代码,for循环将输出"54321",然而for...in是正序输出,它将输出"12345"。
for...in也可以使用break和continue来干预循环操作。
另外,除非是像上面那样很简单的操作,否则不太推荐使用for...in。

今天在chrome上安装了Tampermonkey扩展,折腾一番后想起来给贴吧发帖框添加小尾巴。于是去尝试一番,现在成功了。
document.getElementsByClassName("poster_submit")[0].addEventListener('click', function(){
	var ueditorAllP=document.getElementById('ueditor_replace').getElementsByTagName('p');
	ueditorAllP[ueditorAllP.length-1].innerHTML+='<br><br>Servant Saber、召唤に従い参上した。';
}, true)
原理是给提交按钮添加一个事件,当点击它的时候,在输入框内最后一个P标签内(因为每次按enter换行都会产生一个新的P标签)的html代码中,追加小尾巴的html代码。注意不能使用innerText,因为这样的话,如果最后一个P标签内有图片,则图片会被文字替换,图片就没了。
PS:Tampermonkey可以引用外部js文件,格式是使用// @require,然后在后面加上js文件的url,如下:
// @require /f/keymaster.js
JavaScript 中有一些特殊的字符,如果想要在字符串中使用,需要加上一个反斜线。
代码 输出结果
---------------------
\' 单引号
\" 双引号
\& 与符号
\\ 反斜线
\n 换行
\r 回车
\t 制表符
\b 后退
\f 换页符
使用js设置css属性的时候,属性名经常和css的有区别。例如css中的'backgroung-image',使用js设置的时候需要写成'backgroundImage'。下面就是JS和CSS属性的对照表:
| CSS语法 (不区分大小写) | JavaScript语法 (区分大小写) |
| border | border |
| border-bottom | borderBottom |
| border-bottom-color | borderBottomColor |
| border-bottom-style | borderBottomStyle |
| border-bottom-width | borderBottomWidth |
| border-color | borderColor |
| border-left | borderLeft |
| border-left-color | borderLeftColor |
| border-left-style | borderLeftStyle |
| border-left-width | borderLeftWidth |
| border-right | borderRight |
| border-right-color | borderRightColor |
| border-right-style | borderRightStyle |
| border-right-width | borderRightWidth |
| border-style | borderStyle |
| border-top | borderTop |
| border-top-color | borderTopColor |
| border-top-style | borderTopStyle |
| border-top-width | borderTopWidth |
| border-width | borderWidth |
| clear | clear |
| float | floatStyle |
| margin | margin |
| margin-bottom | marginBottom |
| margin-left | marginLeft |
| margin-right | marginRight |
| margin-top | marginTop |
| padding | padding |
| padding-bottom | paddingBottom |
| padding-left | paddingLeft |
| padding-right | paddingRight |
| padding-top | paddingTop |
| background | background |
| background-attachment | backgroundAttachment |
| background-color | backgroundColor |
| background-image | backgroundImage |
| background-position | backgroundPosition |
| background-repeat | backgroundRepeat |
| color | color |
| display | display |
| list-style-type | listStyleType |
| list-style-image | listStyleImage |
| list-style-position | listStylePosition |
| list-style | listStyle |
| white-space | whiteSpace |
| font | font |
| font-family | fontFamily |
| font-size | fontSize |
| font-style | fontStyle |
| font-variant | fontVariant |
| font-weight | fontWeight |
| letter-spacing | letterSpacing |
| line-break | lineBreak |
| line-height | lineHeight |
| text-align | textAlign |
| text-decoration | textDecoration |
| text-indent | textIndent |
| text-justify | textJustify |
| text-transform | textTransform |
| vertical-align | verticalAlign |

Aniplex+ 1/7 saber 婚纱ver 原型制作:樱前线 协力:stronger。
全高约25cm,售价14040日元 2015年9月发售。
再现了TYPE-MOON10周年「TYPE-MOON Fes.」主题曲「From new world」CD上的图片。面纱可脱。
恩,我这氪不起金的也就看看图。真的很美啊。
Read More →
js的循环中可以使用continue跳过本次循环,使用break来跳出整个循环。
    <script type="text/javascript">
        for (var i = 0; i <= 10; i++) {
            if (i==5) continue;
            if (i==9) break;
            document.write(i+' ');
        };
    </script>
上面的示例中,如果不干预循环操作,那么在页面上将会输出0-10这几个数字。但是干预之后,5不会出现,9和10也不会出现。因为循环到5的时候跳过了本次循环应该执行的操作,而到9的时候,又跳出了循环。
ps:if语句中如果条件后只有一句代码,可以省略花括号。
js中的return,常见的有两种用法。一种是使用'return false'、'return true'来阻止或允许某个动作,代码如下:
<a href="/" onclick="return false">Saber酱的抱枕</a>
此时点击a标签不会做跳转动作。这个方法也常被用在表单验证的提交过程中。
另一种使用方法是用return返回所需的值。
    <script type="text/javascript">
        function add (x,y) {
            var sum=x+y;
            return sum;
        }
        alert(add(1,3));
    </script>
上面的示例里,add函数计算了两个参数相加之和,然后返回结果(sum的值)。这样,我们可以在调用这个函数的时候直接取得结果sum。如果不返回sum的值的话,想要弹出sum值,就只能在函数内操作了,因为函数外无法获取到sum的值(仅讨论此例)。
话说,以上两种方法有时候也可能需要结合起来使用。例如:
    <a href="/" onclick="return skip(this.innerText)">Saber酱的抱枕</a>
    <a href="http://www.baidu.com/" onclick="return skip(this.innerText)">百度</a>
    <script type="text/javascript">
        function skip (x) {
            if (x=='Saber酱的抱枕') {return false;}else{return true}
        }
    </script>
当点击链接的时候,是执行'return false'还是执行'return true',是由函数内return返回的值所决定的。